Contents
Index
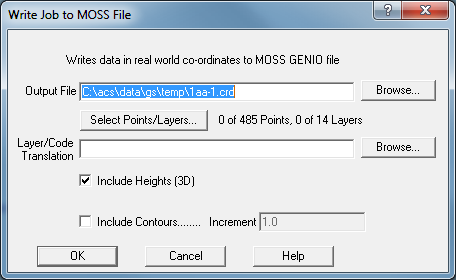
Write MOSS File
The points and strings are written to a MOSS GENIO format file.
The default extension will be .CRD. This file can then be read into MOSS.
The program will convert:
Strings
Points
Text
All Points/Layers
Tick the box to output all point on all layers. Un-tick the box and press the Select Points/Layers
button to select individual layers and or points ranges.Select Points/Layers
Select Points/Layers
You can select individual layers and ranges of points to be written to the file,
enter the starting and ending point numbers of the range of points required.
See Select Points/Layers for more details.
If multiple options are used only those points which fulfil all the checks will be written to the output file.

Layer Code Translation
This option allows layer names and codes to be converted to different (Customer specified)
layer names and codes when writing an output file.
The ACS objects are all output according to their current display parameters.
Attributes such as layer, string type, string name, point code and colour are used to look
up a translation entry in the translation table, the Moss parameters for that table entry are then
used to write the output string or point.
If you choose not to use the layer/code translation file, be very careful with layer names.
Other packages are not as flexible with their layer naming conventions. Some packages do not
appear to allow punctuation or spaces in its layer names. If you get errors when importing the file into
the target package, it may be because a layer name does not meet the packages layer naming convention.
Include Heights (3D)
Check this box to include heights on the points written to the MOSS file (X,Y,Z).
Points
The point code is translated via the translation file.
Strings
The string name is translated via the translation file.
Text:
Text will be written to MOSS file with no layer/code translation
Contours
The contours are translated via the translation file using the contour layer name to derive
a Moss ‘type’ and ‘code’.
Include Contours
Check this box to write the contours (polylines) to the Moss file.
Increment
When writing contours, which form a smoothed line you can enter the interval between the
points along the contour. This is the distance between successive points along the contour in metres.
<?xml version='1.0'?>
<!-- moss to ACSP translation file -->
<config>
    <!-- CONTROL -->
    <moss_format width=12 decimals=4 />
    <moss_translation>
    <moss type="XX01" code="GX01" Descr="Guess what" />
    <ACSP Layer="M001" String_Name="M001" Point_Code="G001" String_Type="Traverse" />
    </moss_translation>
    <moss_translation>
    <moss type="NB" code="" Descr="??" />
    <ACSP Layer="NB*" String_Name="NB1*" Point_Code="NB2" String_Type="Traverse" Colour="Green" />
    </moss_translation>
    <moss_translation>
    <moss type="RE" code="" Descr="??" />
    <ACSP Layer="RE" String_Name="RE1" Point_Code="RE2" String_Type="Traverse" Colour="Green" />
    </moss_translation>
    <moss_translation>
    <moss type="FO" code="" Descr="??" />
    <ACSP Layer="FO" String_Name="FO1" Point_Code="FO2" String_Type="Traverse" Colour="Green" />
    </moss_translation>
</config>
Example 1: Any String on layer “M001” with a code “G001” will be translated to a MOSS point with code “GX01”
Example 2: Any String on layer “NB*”, that is - any layer name starting with “NB”, and string name
“NB1*”, which is a Traverse with the colour Green will be translated to a MOSS point with string label=”NB” and sub_ref=blank.
Number Field in Moss File
You can set the number format in the Moss file by setting the field width and number of decimals
with the following command in the .xml file.
<moss_format width=12 decimals=4 />
The number format is used for string co-ordinate values, point co-ordinate values, text values and contour values.
Notes:
Single un-strung points are output as follows:
080,PTSX,    ,5=       0.0,       0.0,  3, -9999.9, -9999.9
     38.8000     30.0000      1.0000
  -9999.9000  -9999.9000  -9999.9000
Each point is a string with only one point.
Text is output as follows:
001,FORMAT(4F13.3,/,11A4)
080*001,7=6
       38.200,       58.200,        2.500,       90.000
Text One
    -9999.900    -9999.900    -9999.900
THIS CARD IS A DUMMY BUT MUST BE PRESENT
Each text item is output individually.
Note:
1. Points: If a translation file is selected and the point code cannot be translated, the program
will use the original point code in the output MOSS file and will write an error message to the
listing file MOSS_ERRORS.LST
2. Strings: If a translation file is selected and the string name code cannot be translated, the
program will use the original string name code in the output MOSS file and will write an error
message to the listing file MOSS_ERRORS.LST
3. If any errors occur in the conversion, the program will display an error message and allow
the user to view the error file.
4. Where point codes are not required in the output, make the code=”” (blank) for the moss
point as shown below. The point code will only be written to each point if it is present in the
moss code field. e.f code=”PRL” would attch the code ‘PRL’ to each translated point.
<moss_translation>
    <moss type="PRL" code="" Descr="Natural Surface" />
    <ACSP Layer="NS" />
</moss_translation>
